

June 28, 2012 - Here's the photo of January's library roombox that I mentioned in my June 28 post on the blog. In an older post, I had mentioned how I was worried about how dark the room was after I got it electrified but for some reason now it doesn't seem to be a problem. Maybe having stuff in the bookcases makes them more visible or something. In fact, what began to bug me more than the amount of light was the chandelier hanging down basically right in front of the two sconces and really not adding much light to the scene. So I took it out! Sad in a way cause it's a lovely light fixture, but one must do what one must do.


 February 14, 2012 - Just found these 2 photos. I built the shop front in a workshop at a Molly Cromwell show years ago and for a long time I used it to display pottery mostly made by a young guy here in Huntington. Over the years, I had been collecting lots of delightful Christmas minis and wanted a way to display them. I finally decided to put the pottery away and use the shop front as a Christmas shop. So that's what this photo shows. Right now, I'm in the process of making the shop into a dual purpose mini - it will be a pottery shop for most of the year and a Christmas shop at Christmas. I just decided this year when I was putting my Christmas stuff away that I didn't want to put the shop away and that gave me the idea to make it "convertible". Only thing is, I love the Christmas wallpaper that you see in this picture but it covered a mirrored back wall and so I took it off so the pottery shop would have the mirrored background. Tried it out with all my pottery in place and discovered that now I don't like the mirrored back! It seemed fine back when I first made it a pottery store. I wish I still had some of that Christmas paper, but I will just have to try and find another good one. :)
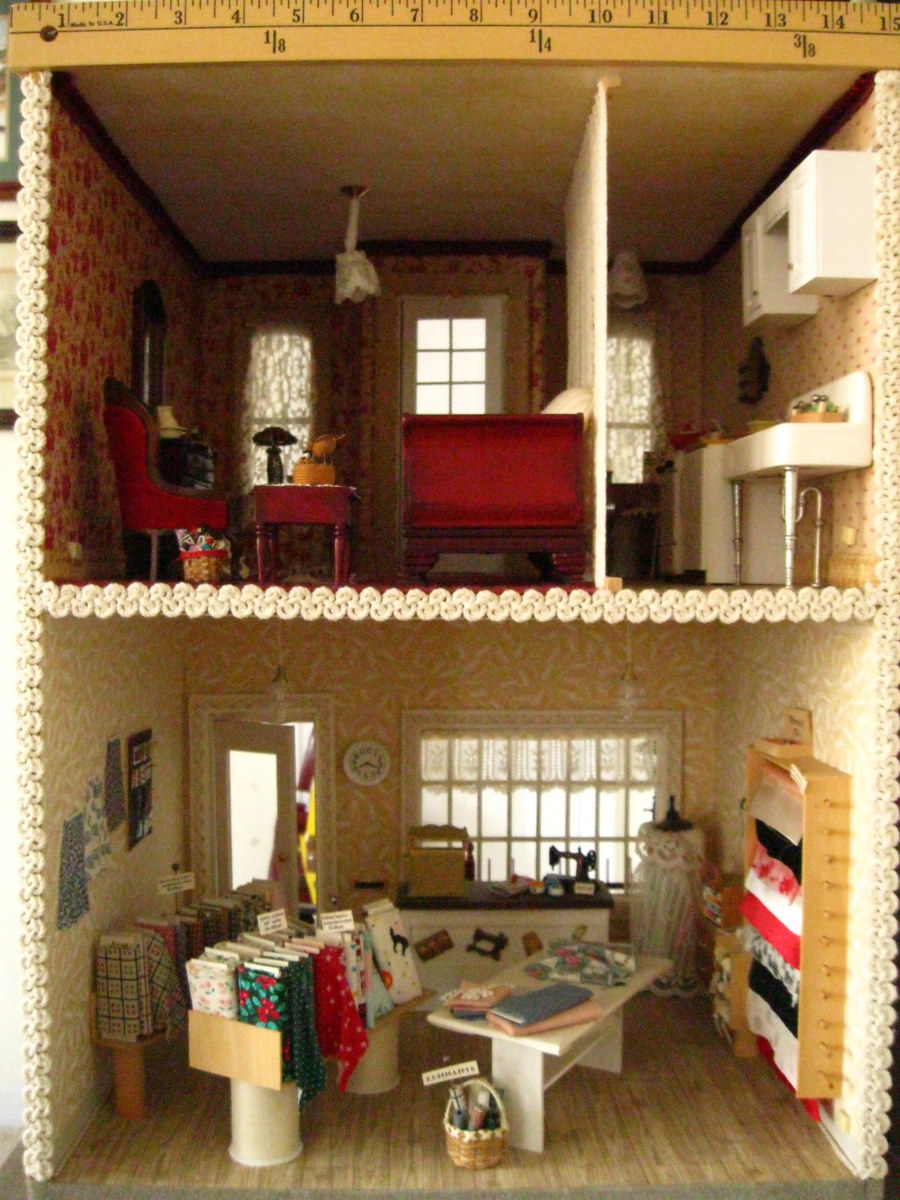
Here are a batch of pictures of my fabric store. This was a project I did NOT want to do. I belonged to a club and it was decided that we would all design and build a shop of some sort and then have a street of shops to display. I didn't like the idea of having to spend a bunch of money making something that just didn't interest me and decided that at least if I made a fabric store, about all I'd have to do is make a bunch of bolts of fabric, but the cost of brick or clapboard siding, all the wallpaper and flooring, light fixtures, etc. - it was just more than I wanted to spend. I was in JoAnne Fabrics one day and noticed a bolt of brick patterned fabric and thought "ah ha! I can use that for siding" and right next to it was some wood flooring looking fabric and then it suddenly hit me - I would use fabrics, sewing trims and sewing notions for as much of the decorating as I could! And once that idea struck me, I couldn't stop. I was constantly thinking of new things I could use. Turned out to be my favorite project of all the ones I've done. So here it is.

 The full front and the full back. Thimbles for light fixtures, thread spools for corbels, darning needles as balcony railing, zippers for corner trim, zipper pulls and tiny brass buttons for door knobs, the yardstick for the top trim, it was just such fun!!

Here's the store downstairs and the apartment upstairs. Fabric wallpaper, fabric floors, various braids for baseboard and door and window moldings, oh, and the store light fixtures are sewing machine bobbins.


Downstairs I made just about everything except the cash register myself. Upstairs I only made the "Tiffany" lamp (a quite ugly button), the kitchen table, and the little stove and refrigerator. Back then at least, they didn't seem to have apartment-sized appliances and my little spinster shop owner had to be able to eat! And since I was kind of proud of how they turned out, here's a close-up of them.


A couple of small projects. The little porch on the right is, strangely enough, a tissue box cover. It's half inch scale and I made the ceiling fan and the strange planter on the wall. :) The little scene on the right was another club project where we were all to make bookends. I enjoyed this one cause I had a bunch of bits and pieces I could use in it. I painted the old wicker chair, made a little cushion for it, made the little birdhouse, and the flowers were a gift from someone. The backdrop is part of a "real life" wallpaper border.

This next batch was another pretty much all-time favorite project cause it was my own idea for one thing and I don't have too many creative ideas. This project started out as a tree shaped papier mache box of the type they sell for crafts. It turned out to be perfect for making a 1/4" scale Christmas house.


So, the whole little house on the left and a sort of closer look at the living room and upstairs bedroom. I should probably work at getting better pictures of this. Maybe when I pull it out this Christmas. The majority of the things in the house I either made myself or received as swaps back when I was a member of an on-line 1/4" scale group. The little window on the left side of the house looks into the "kitchen" - I just painted some blocks of wood to look like cabinets and put them in there.

 A closer look at the bedroom and a slightly better view of the stairs up to the front door. This project probably represents my most "artistic" endeavors. I am not a landscaper nor am I very courageous about things like making shingles look snowy. But I worked up the courage and took a stab at it. I used puff paint on each individual shingle and then while is was still wet, sprinkled on micro-fine glitter. Very tense work for me, but I was very pleased with the result. The lights actually light up, by the way.

 For all my Christmas scenes in bags and such, I always make my own fireplaces and decorate the trees and wrap the presents. And that's all I made in this one except for the room itself. And if you enlarge the picture on the right, you'll see the wintry outdoor scene through the window. I've always meant to make one of these for myself but haven't got to it yet. :)
The first time I made something for the hospital's Festival of Trees was when they asked me to build an entire dollhouse, finished inside and out and furnished. That was a big undertaking but the wonderful part was they paid for everything which was pretty neat getting to buy it all without having to spend any money! :) They didn't auction the house, they sold raffle tickets instead. And the woman who won it had three daughters so it went to a home where it was well loved. I only have these two pictures
I'll take a break from structures now, and post some pictures I took when I started this page. Just wandered around the apartment and took pictures of all the little bits and pieces I have sitting here and there. I can't stand having them all packed away in boxes...

 The little group on the left sits on the open shelf section of my hutch. I wish you could see how cute the little teapots are - they're all painted with different flowers, one is a little cottage type pot, etc. I really like the little wall shelf. I tried making an actual tea shop but failed miserably. May try again some day. The piece on the right is a beautiful walnut hutch by Marcia Gardner. The two candlesticks are sterling silver and the roast on the platter is by a woman who always had a table at the Fairmont, WV show until she passed away and made some of the best looking food items I've seen. Very, very realistic.

And the first thing I did with my teapot collection was again for a club display - I had a book of tea lore and recipes for teacakes, etc., and used that as the two walls for a corner scene. I finally dismantled that because I wanted to look through the recipes!

 On the left, an absolutely gorgeous chair that the woman who introduced me to the wonderful world of miniature show gave me when we were at a show. It's hand made and I wish I knew the man's name - I didn't know back then to pay attention. The little chess set is actually carved in the standard shapes. The table is also a handmade piece. On the right is a beautiful birdcage my son gave me one year along with a birdhouse with a little metal roof that a friend gave me, and the painting of the birds above it all was a gift from my daughter, Heather. The little garden bench was a souvenir from one of the Cincinnati Society of Miniatures shows.
 The Hummel figurine was my mother's - she loved Hummel. And I was lucky enough to find a miniature matching Hummel by Robert Olszewski who was (is?) a well-known artisan who did lots of Hummels along with other figurines. It and the little bit of stuff on the right (books and bookends that we made at a club meeting and a very tiny bust of someone) are on the shelves in the secretary desk that my daughter January and I brought home from my mom's house in a Volkswagen! after she passed away.

 The next photos are just close-ups. The shaving stand was a gift from my son, Chris, and January gave me the little painting on the wall behind the stand. The flowers in that window and the little spinner thingie were also souvenirs from NAME conventions. The little red box in the other window with the tiny dolls in it was a table favor (at those conventions, everyone is invited to bring 10 "favors" to give to their tablemates at dinner. This little box came straight from China to the convention - the woman had just arrived back in the states and came straight to the convention!
This next set of pictures are of my chocolate store. I had collected chocolate "stuff" for several years and knew I wanted a store but couldn't think of what I'd call it and hadn't really thought too much about what it would look like. I was in a Hallmark store at some point and saw the Queen of Chocolate ornament and thought "Eureka - my store will be 'The Chocolate Castle' and I'll try and make it look kind of castle-ly." So that's what I did and this is how it turned out. I set out the luminarias last Christmas and liked them so much I left them there.

I can claim pretty much all of this project as my own work. The actual store part was a purchased wood craft box but I made a front wall for it, cut a doorway in the side, made the tower from scratch, made the entry door myself, made the turreted top (unfortunately using balsa wood and so periodically I manage to break one of the turrets off and have to glue it back on).

 I made the little chest in the entrance way, and used a scrapbooking castle sticker to make the little castle sitting on the chest. I made the two "topiaries" out front using Fimo pressed into candy molds. Made the chocolate brown blocks by using brown construction paper and printing off a block-sized gridwork on my printer. The only thing I made in the window, though, is the little tuxedo cake. I also printed off and framed the pictures. I really enjoyed this project and was pleased with how it turned out.
This next one is a very simple little corner scene.

 I bought the chair at the Dollhouse Museum in Washington, DC and it's one of my little "treasures". I came across instructions quite a while later in a mini-magazine for making a wall-hung book shelf thing and used those instructions to make my very first (and only to date) piece of furniture. I have to admit to being quite proud of my bookcase. My sister gave me the painted trunk under the window. She found that at an art fair in Massachusetts. You may not be able to see it in the picture, but I put an outside scene behind the window and made the curtains also. And the second picture shows how I finished the outside of this corner vignette.
This next batch of pictures are my half scale house. The main body of the house was from an old Houseworks kit and like so many houses, had four rooms. I always want a dining room and I always want a bathroom so I built my own addition on to the house. It's not perfect - the floor slants a little, I should have put a window on the second floor, etc., etc., but that's how it goes with old houses.


I think the kitchen is my favorite room in the house. I love the cozy bay and the country feel with the beamed ceiling.

 I kitbashed a staircase kit because I get tired of the stairway always going straight up from the front door, so I made it as you see. I forget now how I messed up that upstairs wall, but to cover whatever the problem was, I pasted on a "mural" that is actually a section of real life wallpaper border. I allowed myself the pleasure of buying some special pieces for this house. The dining room and master bedroom furniture are Bespaq (would be nice if I'd get the bed "dressed"!) and the living room settee and chair are artisan pieces I bought at a Tom Bishop Chicago show. Other pieces in the kitchen and child's bedroom are also hand made. Don't forget to click on the pictures if you would like to see a larger size.
You can't see it, but the picture over the mantel is one I cross stitched and there are glowing embers in the fireplace. I've built several dollhouses but this and my fabric store are the only ones I've kept. A couple I sold, some were for raffles and charity. But I love this little house and I love my fabric store and enjoy having them in my living room where I can peek into them periodically.


This little beach scene in a box was a gift for a co-worker and friend who was retiring. The backdrop is an enlarged photo from my one vacation to Cape May.

The conservatory was for a hospital (the one where I worked) auction - fun because they paid for everything! I didn't make ANY of the plants - those were all ordered from a woman in Canada who does beautiful work with flowers and plants. I just did the "construction" - back wall with electricity, floor, interior decor, etc.


 The billiard room is the roombox I made for my oldest daughter who loves playing pool although anymore she's pretty busy with everything else. I bought the settee and real leather upholstered wing chair at one of the Chicago Tom Bishop shows and justified the expense with the decision that it would be for a roombox for my daughter. After that, it became a good excuse to buy all sorts of "treasures" knowing that they were for future roomboxes for Chris and January, my other two children. :)
 I went through a spell of making personalized Christmas scenes in Christmas gift bags and personalized wedding and graduation scenes in domes. The Christmas scenes had cross stitched stockings with family names and any special decorating ideas that the buyer requested (one on left replicates a picture of the buyer's parents' living room; one on right is a turquoise and peach beach theme). The graduation and wedding scenes had a cross stitched sampler with names and dates and the invitation on the back of the arched wall and in the wedding scenes, there was a bible on the table in which I inserted in very tiny print, the scripture that was read at the wedding. I also did the Victorian bag and the "sparkle" bag as raffles for the hospital's Christmas fund raiser.


