About Me

My photo
West Virginia
When I started my retirement travels in 2009, I wanted a way to share it with family and friends as it was happening. Hence, "My Travel Journal". However I realized I wouldn't always be on a trip and wondered what to do with the blog in between times. My daughter pointed out, wisely, that travels can also include trips to the kitchen to try a new recipe, trips to visit family, trips to my neighborhood Starbucks, or a fun day trip with a friend. You're welcome to join me on any of these journeys! I've set up individual pages for each of my major trips (see tabs above).

Also, I have an Etsy shop where my current needlework resides. The last pieces I posted here were in 2013! So if you'd like to see what I have accomplished recently, go to (and I apologize for having to copy and paste):

www.etsy.com/shop/thedollhouseneedle

I recently added an "Italian Word a Day" thingie which shows up at the bottom of every page. You see the word and can click to hear it pronounced. I've been enjoying it and I think my accent is improving as time goes by.
Showing posts with label miniatures. Show all posts

December 19, 2012

A pre-Christmas post...

...to extend best wishes to all who celebrate Christmas. May it be happy, healthy, safe, and filled with the love and warmth of family and friends.

I'm getting ready to head east and will be seeing all my kids at various times over the next couple of weeks. Our first present exchange will be with Heather and her family. January, Maggie and I will go up there Friday, stay overnight, exchange our gifts Saturday morning, have a little more visit and then come back to January and Maggie's new home. They just moved into what sounds like a delightful house on December 1 and I'm really eager to see it. Then, Monday afternoon sometime, Chris will come over to January's house and spend the night there and we will do our gift exchange on Christmas morning. January is going to cook a wonderful slow-roasted pork that she made one Thanksgiving, and I've been thinking about little else ever since she told me that's what she's having.

So, I've been busy with a little last minute shopping, wrapping - which I hope to get finished before I leave Huntington, and, strangely enough, changing my miniature Christmas shop (which I changed into a pottery shop a while back) into a Christmas shop again. And one thing I've learned is that if you make a mini you like (in this case the first Christmas shop), don't take it apart and turn it into something else! I'm quite pleased with my change back to a Christmas shop but I really miss the wallpaper I used in the first one. But I added a few more bits and bobs to make up for the wallpaper not being very exciting.

Here's how it ended up.


And the two sides:


Here's a link to the first Christmas shop just in case you want to play "can you spot the differences".  (tee hee):

https://blogger.googleusercontent.com/img/b/R29vZ2xl/AVvXsEhAlTGMA8xZizO5_IG-byfdCvtfoUgTvZppz0UREWYnbBgPjsY41mEhb40MCXkQdeixG_sBNuYPImgXHPkLrS5Ot4Zy-NuQhXdAqj6hc38nnMWuQ0VhiIdkVtHRf3UySsVx4AOSpnEGXt4/s1600/IMG_1755-1.JPG

By my count I added eight things and changed one thing and rearranged a couple of things.

So it will now remain a Christmas shop forever and I'll have to figure out another little display for my pottery.

I saw a neat piece at the annual miniature art show.  A woman had used a shadowbox-type frame, attached little short shelves, staggering them on the back, and put one little piece of pottery on each shelf.  I think I'll see if that's something that I could do with my pottery collection. 

And, now that's it!  I have to get going and finish everything up and be ready to get on the road tomorrow morning.  Thank heavens, the sun is actually shining today and I'm going to try and get the car fairly well packed while it's not raining (which it seems to do constantly!).
 
And we heard her exclaim as she drove out of sight..."Merry Christmas to all, may it be a delight!"

April 24, 2012

Moving right along...

Yesterday I got the wallpapering finished and started on the wainscoting.  I had to paint, sand, paint, and varnish an extra strip of the wainscot cap because for some reason I had only done one.  My brain must have been running low on that day!

On the left, all finished with the wallpaper which gave me more fits than I would have liked.  My idea of making a slicker surface for the paste to slide on didn't seem to help much.  But it's on and I am pleased with the seam at the ceiling.  I didn't really want to install crown mold and the meeting of ceiling and paper is good enough that I don't have to.  It's not that I'm lazy or afraid to - I just think with the smallness of the room, all the wainscoting, and everything I want to put in it, it doesn't really need more "trim".  I left the two blank spaces for the bookcases.  They won't be built in, but they won't be sticking out as much from the wall as they would have with the baseboard and wainscot cap running behind them.  I should probably have taken the paper all the way down to the floor though, but I didn't think of that til I had the wainscoting in.  Which it is in the photo on the right and I'm really liking it.


I know - all the pictures look alike but they're not.  The one on the left now has all three walls with the wainscot applied and the one up above only had 2 walls.  So that's progress, right?  And the one on the right shows the bookcases in place and the wainscot cap installed on the two side walls - still need to do the bit between the bookcases.  And in this picture the room looks deeper than it is wide and that's not the case.  The room measures about 15" wide by 10" deep and the ceiling is about 10" high.


Next will come the wiring and I've drilled a hole on each side wall and in the ceiling to start.  I'm going to use sconces on the back wall and want to try one of those on/off slide switches so that just the lamp(s?) and sconces could be on sometimes.

And totally off topic, here's what I had for dinner last night.  I haven't been doing much cooking and haven't been eating much in the way of meat and when I'm in a phase like that, I finally get to where I'm craving some beef.  So yesterday I bought myself a little filet and cooked it on my cast iron grill pan.  Already had the potatoes and I rubbed them with olive oil and sprinkled them with the seasoned salt my sister gave me back some time ago and roasted them in my toaster oven.  Had the zucchini and yellow squash also and browned it up in olive oil with some garlic and a little more of the seasoned salt.  And, oh boy, it was good!!

Tomorrow, I hope to get some actual wiring done although since I'm taking the lamp wires to the outside of the box, I may get done as much as I can to everything before I actually wire the lamps in so they won't be rattling around as I'm turning the box upside down, etc.  Guess I could always tape them to the floor...or maybe I should put an outlet on the outside of the box...no, that defeats the purpose of wiring outside - I want to solder everything so hopefully they won't just quit working one day.

Anyway, that's today's report!

April 23, 2012

January's Roombox

I wasn't going to blog about my progress on this project since January reads my blog and I thought she might rather not see it until it's completed.  So, January - this is a SPOILER ALERT!!!  Quit reading if you don't want to see pictures. :)

This is a Houseworks roombox kit which I put together about a month or so ago.  Only had one real issue with the kit which was the instructions tell you to glue the two sides and back to the outside of the floor, which is fine.  But I got that done and then wished I hadn't because the last thing they have you do is glue the top piece inside the standing walls and back, and whether you glue the edges of the top piece (which I did) or glue a bead around the top of the walls and back, you have to slide that top piece into position - not good.  What I should have done was glue one side piece and the back to the base piece, glue the top onto the edges of those, then glue the other side piece to the outside edges of the base, back and top pieces. 

Before running into that problem, I had put the petitpoint rug, two finished bookcases, and other major pieces into the box to see how it was going to work.  It was all right, but I figured it would look better if I extended the depth by an inch - there would be more floor showing around the rug.  Fortunately, the sides were 1/8" think MDF and the floor and ceiling were 1/4" thick MDF so I just bought strip wood in those thicknesses, cut them to size and glued them on.

So, here in pictures, is where I am this morning and some of the steps getting here:

This first one is after I made the decision to deviate from what January had told me she would like.  She wanted not only the bookcases stained, but all the woodwork and once I finished the bookcases, I  just couldn't bring myself to do all the wainscoting and baseboard (and possibly crown molding) in that very dark stain.  I did stain some of the wainscoting to see how it would look and in addition to being dark it had the usual problem of not taking the stain well.  So, after much agonizing over colors I chose this one.  The piece on the left side is where I had painted a scrap with the color and then used an antiquing glaze over it.  I decided I liked it without the glaze better and will just use a regular satin varnish on everything.


After all my deliberations, it was time to get to work.  First, install the floor (Houseworks red oak stained with the bookcase stain).  On the left, it is in and weighted down with many books.  I managed to think ahead and lay a piece of waxed paper down over the flooring before I put the books in, just in case some glue oozed out.  You can also see on the side and top the extension pieces I added.  On the right is the finished floor which turned out fine - no glue smears, bubbles or bulges. 

Next I glued in the sidewalls' baseboard pieces.  Don't remember why I decided to do that - maybe just cause I wanted to!  Then, I primed the walls down to a little below where the wainscoting will go and also primed the ceiling.  On the right, the ceiling paper has been installed and glory be, it didn't bubble!  I've had that happen sometimes.  I used actual wallpaper paste and had a little trouble getting the paper in, mainly because as soon as it hit the surface, it grabbed and wanted to stay put.  So I decided before I paper the walls I would sand them lightly and then put a thin coat of ModPodge on them to hopefully give me a slightly slicker surface.

I'm basically enjoying this project although it's been kind of nerve-wracking.  Back when I was doing this type of thing with some regularity, I learned all sorts of tricks and construction became relatively simple.  But it's been so long that I find I'm a lot more nervous about it now.  Not having a really good workspace doesn't help either, but I think some of the worst is over.  I'm ready to paper the walls now - am going to do that before I install the wainscot.  I think the only other really difficult part may be when it's time to attach the grooved molding around the front edges that allow an acrylic front to slide in and out.  I've done dry runs already and it does go together, but somehow I just see "danger" signs when I contemplate it, so I've already told myself if it doesn't work, I won't panic - I'll take it to a framer or something and have them make something that will work.

More to come...

April 14, 2012

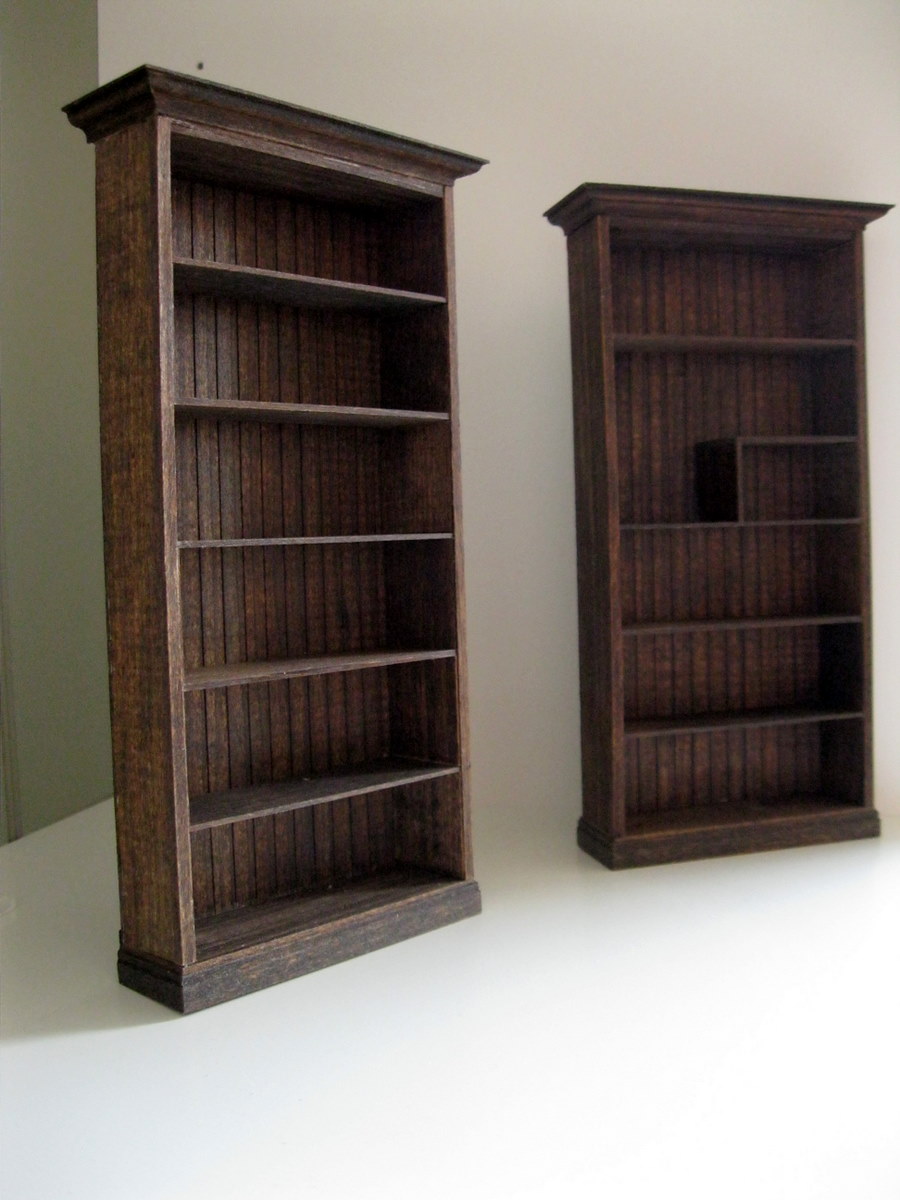
Unskilled laborer builds bookcases

Believe me, this is not a tutorial.  And a number of my on-line miniaturist friends will probably shudder if they see this, but here is how I made my two bookcases for January's roombox.  Actually, these are my second and third bookcases using the same method.  And these two turned out fine for sitting in the back of a roombox, but I'm not as happy with them as I was with my first one.  But then, I'm a little old lady now with shaky hands, nowhere very good to work, and not anywhere near as good eyesight.  Those are my excuses and I'm sticking with them! :)

My equipment consists of a craft knife, a miter box and saw, three different gluing thingies for keeping pieces squared while the glue dries (none of which am I really thrilled with), clamps, masking tape (which I used a lot of) and a cutting mat.  So, this isn't professional quality, artisan furniture building here.  As an aside, if you want to see that, you need to visit Elga's blog (see my profile for a link).  She's the lady from South Africa who I will be meeting in Amsterdam to visit that German miniature show.  Her woodworking skills sort of boggle the mind and she's only been at it maybe a year or two, if I remember right.

So, okay - mostly pictures now.
When I made my first bookcase, I actually managed to come up with a good way to get pieces of wood cut to the same length which probably anyone else who has only the miter box and saw to work with has also come up with, but just in case - it's as simple as taping the two pieces of wood together and cutting them both to size at the same time.  Doesn't work for things that need a miter cut, of course, but for straight cuts, it really is a help, at least for someone like me who finds it impossible to mark two pieces of wood separately, cut them in the miter box separately and have them come out exactly the same.  So these two pictures are just starting out after having stained all the wood.  On the left, the wood for the sides of the bookcase is taped and in the miter box and on the right, the first side piece has been glued onto the back and is clamped.  I realize stained wood doesn't glue as well as raw, but the rock and the hard place one has to choose between is either a better hold for the glue, or avoiding spots that won't take stain because they've had glue on them.  I opt for the second choice. 


 Don't ask me why every other picture shows the wood a different color.  I'm not a professional photographer either!  On the left I've added balsa wood to the bottoms of the cases so that the baseboard will have a better surface to glue to.  And one of the bookcases already has its crown molding in place.  To do that, I first glued pieces on the top as shown in the picture on the right, again giving myself a better surface to glue to.

I wish they really were this color, I really like it. :)  But I couldn't keep buying cans of stain until I found the perfect one!  I debated gluing each piece of crown molding on separately, gluing all three pieces together first and then gluing the whole thing on, or doing it this way which was to glue one corner together, glue that piece on, and then glue on the other side piece.  The reason for this was because had I glued all three together first and then tried to glue it on, I would have had glue all over the place I think.  And if I had glued the three pieces on separately, I think it would have been more difficult to get everything thing as straight as I got it (which still isn't perfect!)

In these pictures I'm starting the shelves.  You can see two shelves cut out with the tape still around them on the left.  Also in that picture are two side pieces that I cut taped together.  When I made my first bookcase, I really had to ponder for a while how I could possibly hope to get level shelves and then this idea dawned on me.  I cut out the little side pieces, glue them on each side, lay the shelf on top of them (in the picture on the right), glue on the next two side pieces, and so on.  I don't even have to glue the shelves in!  And, voila (I'm going to France!), level shelves.

And, finally, here is the finished product and in basically the true color.  The last thing I did (that you can't see) was glue on narrow strips of trim wood down each side to cover the shelf braces so it looks like the shelves are inset into the sides.

The bookcases have several hidden defects, and the stain and finish is not the quality I'd prefer, but when filled up with books and other goodies, I think they'll do quite well.  And I got fancy on the one and made the half shelf so I could have something taller in the open space or maybe even hang a little picture or something.

So now onto the roombox.  I cleared off my cardtable, dusted the sawdust off my windowsill and pulled out the roombox and put it on the table with all the electrical supplies so I'm ready to get started on it.  I'll post shorter progress reports which I have progress to report. :)

February 23, 2012

I Got It Done, I Got It Done (sing-song voice here)

My pottery shop is finished.  And that's finished in the sense that I will sometime make a sign for it - thinking of either "Purely Pottery" or "Pottery Plus".  And I may fool with the arrangement of things a time or two although I'm happy enough with it right now and will wait awhile to see if I want to do any rearranging.  It's fairly frustrating work with shaky old hands.

But here it is.  Of course, when I got it placed where it will sit now, I noticed that I hadn't cleaned off the glue residue from when it was a Christmas shop and I had glued a sign on the glass to cover the window shade and "closed" sign.  So that's something else I still need to do.


And here are two close-up pictures of the window - both of them having different good and bad points, neither of them perfect.


The colors in the picture on the left are probably closest to true.  But without the light, it's pretty dark looking.  With the light on you can see the little figurines my sister gave me a long time ago and, for which til now, I've never had a spot in which to display them.  They're miniatures of a famous kind of French figurines that I can't for the life of me remember what they're called..

The wallpaper turned out to be a little dark although it does look better in real life - still kind of dark but not as dark as in these pictures.  If I call it Purely Pottery, I suppose I would need to take out the blue bottle and maybe even the figurines.  So I will probably call it Pottery Plus.

And I know I've posted pictures of the Christmas shop before, but just for comparison, here's what my magical shop will turn into come next Christmas and thank heavens that should not be quite as maddening as this project with its shelves!  I'll just put in the second back I've made and place everything like it is in these pictures.


"And I sure wish I could have realized I didn't have to tear off that wallpaper", she muttered sadly as she wandered out to the kitchen...

December 28, 2011

Images of A Merry Christmas, 2011

Still in Virginia, but another Christmas is now history and a very pleasant and happy one it was.  I've taken photos most days and am just going to post them with bits of explanation.  The first batch, taken at January and Maggie's delightful new-to-them home, were taken on Christmas Eve.

First are some pictures are of a little miniature scene I made as part of a club project quite a few years ago. When I moved into my apartment and told my children to take what they wanted of my Christmas stuff, January took this scene and it's always nice to see her at Christmas and get to see this again.


Next is a little Christmas village my sister made for me years ago and January now has that also.  You can just see in the first picture the names of my three children on the cars.  Then there is a Simpson Garage and an Oney (street where we lived then) Market.  


Chris took my tree when I moved and I was very glad about that too because I absolutely love this tree.  When you see it "in the flesh", the trunk is thick and covered with "bark" and the branches aren't full of needles - there are bare places which makes it very natural looking.  Also, it is a nice slender tree for how tall it is.  I'm posting a number of close-ups of it partly hoping the trunk shows a little but also to show some of the crochet and cross stitch ornaments I made.


I didn't make this wonderful bird - just had to take his picture.


And here is one of January and Maggie's two cats (Booty and Dandelion) posing for a Christmas card to wish everyone a Merry Christmas!

The next photos are from Heather and Alex's home.  Not as many as there should be (no dinner pictures, no good present opening pictures, etc.) but we were all having too much fun and things were a little too hectic to remember to take pictures!

In fact, this is the only present opening one I'm using but it's pretty special, isn't it?  Sophia is holding a mug she made for me in her kindergarten class.  She drew and painted the chicken herself and then her artwork was applied to mugs, pencil cups and such so everyone got a chicken present.  The other side of mine I am compelled to tell you says "the world's best grammy". :)  She is certainly the world's sweetest grandbaby!

Next come Johnny and Sophia grooming their new miniature horses out in the barn on a very cold night after Christmas.  These weren't Christmas presents - they've been in the family for a few weeks now.


And, the last one from Heather's house... a too-late-for-Christmas but early enough for New Year's gingerbread house that the kids and I made today.  It was a kit, thank heavens - I didn't have to do all the baking.  But it was a fun little project and for how I struggled with the darned frosting bag (my first-ever experience with one), it looks pretty decent ... in the picture!  LOL!!


And, last of all, a sight I saw on my way up to Heather's on a very bright sunny day but wasn't able to get a picture from the car and then saw it again on the way back today and was stopped by a red light so took this very quick shot which doesn't do the scene justice:

The three trees are wrapped in tinsel garland and in bright sun really make an impact.  The snowflakes and the snowman are also very glittery.  First time I ever saw trees wrapped in tinsel!!

So that is an incomplete picture show of Christmas this year.  Chris took myself, January and Maggie out for a very nice dinner on Friday evening and Heather took me out for a very nice dinner last night but I couldn't very well take pictures of that.  Both were wonderful, though.

I won't post again before 2012 so I hope everyone has a great New Year's Eve (and safe, please) and a healthy, happy, hopefully prosperous, and just generally great 2012!

September 26, 2011

What We Brought Home from IGMA Show

Okay - this will be a little show and tell and poor Chris will hang his head and cry when he sees the pictures I took of his treasures.  I even sat the camera on the shelf so it would be steady and they still look grainy to me.  But, Chris - you will have to take pictures yourself at some point and then you can post them on your Better Photo Gallery and they will be gorgeous.

Chris ended up with three wood turnings by the same artist. He bought two and one one in the live auction after the show. This little piece has a beautiful grain which changes appearance as you turn it this way and that and the light catches it. The lid fits perfectly and it's a sweet little piece.


He also purchased the bowl on the left during the show from the same artisan.  Again, the picture doesn't come close to showing the lovely grain in the wood and the fact that the band around the top is of a different wood.  The footed bowl on the left is the piece he bid for and won in the auction and it's a beauty.  Chris told me the way he got the very thin white pieces into the bowl was not with inlay, but by first composing a block comprised of dark wood pieces and light wood pieces in such a way that when he turned the block on the lathe, this was the result.  It is beautiful.  The base is a black wood.


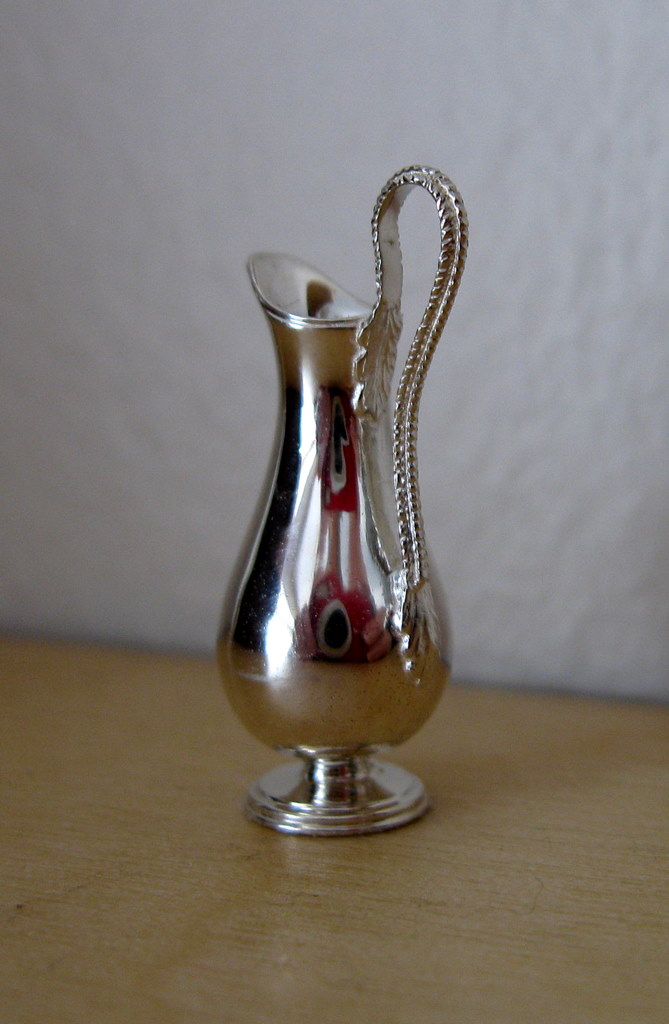
And the piece de resistance for Chris:  this stunning ewer in sterling silver fashioned by Pete Acquisto - probably the best known miniature silversmith working today.  You may need to enlarge the picture on the left to see that the handle has a double row of beading running the length of it and is attached at the base with a leaf-patterned design.  I apologize that you see the reflection of my camera but that's how shiny it is. 


Chris certainly brought home the true treasures this time.  I didn't really buy very much, just enjoyed the atmosphere after a long time away from it.  I went hoping to find bits and pieces for my little half inch scale scene and I did find plates which was especially what I was searching for.  First bought some plain white porcelain ones and then discovered Ginger Langdon Siegel was there with her wonderful 3-dimensional framed miniatures.  I had visited her site on-line and saw that she had pretty little 1/2 inch plates made out of paper but on line she just had them shown in sets of 4 plates, all with different patterns.  At the show, she had a whole bunch of loose plates and I was able to pick out six of one pattern and I think 5 of another, so I'm pretty well plated.

I also bought a beautiful little handwoven basket of fruit that I can put on the hutch, table, or wherever and a little cookie jar.  And I finally found a globe for January's library scene that may someday get built. I will probably take it off of this base.  It was part of a boxed set she had made.  The top of the box had a little magnifying glass insert and was quite delightful but I didn't want it in a box so she said she would sell me just the globe and save the top to make another one sometime.  I've saved her information, but it's packed away until I get home so I can't tell you the name of the artist.  But she had all sorts of neat things, including orreries (those antique mechanical thingies that showed the sun with the planets extending out on arms around it).  If anyone wants the information on her, either e-mail me or say so in the comments section and I will be able to post it when I get back home in a week or so.

So I think that really and truly ends the report on my NYC and IGMA trip.  Kind of hate to see it come to an end, but I've enjoyed today too, getting up to Heather's new house without getting lost one time (thanks for the directions, Chris), seeing my wonderful grandkiddies again, and especially meeting the alpacas!  Weird but kind of endearing...I will be heading down to January's on Thursday once I know Heather has come through her "let's break her arm again and fix it right this time" surgery...poor thing.  I feel so bad for her.  But, hopefully a month or two from now, she'll be feeling pretty much like a person with two good arms again and can put all this behind her.

Italian Word Word of the Day

My Trusty Followers

Blog Archive